Penny-pinching car geek's guide to racing, track days, and car build. DIY projects, product reviews, and interviews.

Sunday, December 26, 2010

Cheap Phone Mount

I was at wal-mart and I found this:

Believe it or not, Wal-mart generally chooses products that are decent quality for the price. In business school, we were repeatedly lectured on how strict their selection processes are, and it was a prime example of buyer's power and how far involved in your business they can be. 

So this should be a decent piece; however, the size of the suction cup is very small. I am not sure how it will hold up on the track. If someone tries it out, please let me know. I am broke from all the holiday spending so I will not be testing this piece. Furthermore, I already have two good working phone suction mounts.

UPDATE: A local enthusiast told me that the suction cups on these things are too small to provide the stability you want. If you buy this and you are really penny-pinching, I recommend this: Drill two holes on the dash, and loop a zip-tie through it to hold it down on the dash. It is semi-permanent but the lap timer holder will double as a cell phone holder. Another option is to get heavy duty velcro and see if there are any suitable places to mount the holder.

Saturday, December 25, 2010

Merry Christmas!

Merry Christmas readers!
My blog readership is growing every month. I truly appreciate all you readers. I enjoy writing on this blog more and more.
I hope your holidays go well! I am currently with the in-laws for Christmas dinner.

Coming soon:
1. Aerodynamics projects and finished items.
2. How to start your own track hobby.
3. Simple fabrication tips - tools of the trade.

Drive safe and see you again soon.

*Above picture is not mine. From www.medgadget.com via google

Monday, December 6, 2010

Strapping In - Spec Racer Ford Documentary


This is a good video on who, what, when and why of club racing. Specifically spec racer ford. Also, it happens to be my arbitrary goal; I want to be able to afford SRF some years down the line.

Professional Videographer Ryan Boyce did this for his senior project while he was at college. Great footage, sincere dialogue, and good pictures. I like how this video is done from an amatuer (club) racer's perspective.  Everyday people like you and me! Anyways, it doesn't get too technical but it does talk about why and how people get into racing.

Ryan's youtube channel is here:  http://www.youtube.com/user/BebalonesIC Please check out his other work.

Also, stay tuned: there is a guest entry in the works!

Thursday, November 25, 2010

Life, November 2010

Left to right: Yours truly, and classmates Kevin and Nguyen


On a side note, I got married recently.  I still have the family ceremonies to do, and that is planned for after I pass the bar exam.  But as of this week, I am a married man!  Wow.  I did not see that coming.  No one else did either.  I'm getting the full law school experience; J.D., wife, what else?  I can't wait until I see what life has in store for me. 

Last weekend, I went to a bar association conference.  I also had a job interview.  Good results!  I found someone to mentor me, and I met a lot of great people.  But most importantly, I will be in California this winter working a temp job at a law firm.  I am going to do my best and see if that will take me elsewhere!  I know this sounds cheap, but seeing Ferraris and McLarens as I drive to my interview really drives me to work harder.  I don't plan on living in vanity, and I'll probably never own a Ferrari to drive around, but I do plan on having enough money to raise my family and go wheel to wheel racing.

J.W. Mariott

Wish me luck!

Tuning the RX-7 AFM - Resistor Trick

A bit of searching on the forums revealed an old but simple and effective to tune the RX-7 AFM. The RX-7 AFM runs too lean, even though it still performs better than the stock AFM. This is especially true for the lower RPM's. It would help to adjust add more fuel at all RPMs. This isn't optimum but a good compromise between simplicity and price. Thanks DVCN for the information. Basically, you will be soldering in a resistor which would adjust the AFM throughout the entire RPM range.

Stuff needed:

1. RX-7 AFM

2. 25ohm resistor (Actually, anything between 20-25ohms) - Less than a few bucks at Radioshack
3. Soldering equipment
4. Sealant (RTV works great)

Air to fuel ratio

I'll do a short write up about what Air-to-fuel ratios are. There is a certain optimum Air-to-fuel ratio in each engine. Theoretically, the most optimum ratio is called "Stoichiometric mixture," which is approximated as 14.7 parts air and 1 part fuel, with numbers representing mass.
The AFR is generally expressed in this manner. When someone says "AFR at 15" it means 15 parts air, 1 part fuel. Maximum torque usually occurs a bit under Stoic mixture. According to my co-driver Brian, who is also a mechanical engineer, this is due to the fact that air and fuel does not optimally mix. That is partly why electronic fuel injection is better than carburation, and direct injection is better than regular injection, and why all these different injection methods have been developed. Some of these injection methods attempt to create a condition where maximum torque occurs closer to the Stoic mixture. This makes the car more fuel efficient and more powerful.

Generally, a leaner burn is good for fuel economy because less energy is lost to heat. Slightly richer mixes result in more torque and cooler burn, preventing knock.
Air-fuel mixtures are usually measured with an O2 sensor. A wideband O2 sensor is crucial for this kind of tuning, not that you need one to do what I did. Anyways, a 16+ year old miata engine is far from having any sort of fancy injection technology and optimum torque occurs a bit below 13:1.

People adjust this a little bit by adjusting the spring tension of the flapper door in the AFM. Looser spring means more fuel, as the door opens more and the AFM sends a signal to the computer that more air is coming in. Of course, in reality the same amount of air comes in regardless of the flapper door angle, but it does mean that the door opens up a bit more. Usually people tune by adjusting the spring 5-7 clicks looser. I don't know how much AFR is adjusted this way, but I do know that it is less optimum than this trick. Furthermore, the spring method messes with the idle, and you have to take further steps to make the idle behave.

The Resistor Trick

DVCN, who came up with this method of tuning. He found out that adding a resistor to the circuit on the AFM adjusts the mixture. He measured the following on the wideband:


20 ohms:
15's below 2k, 13's in the midrange going to 12.7 at 7000rpms.
25 ohms:
Just slightly richer everywhere, going to 12.3:1 at 7000 rpms.
100 ohms: In the 11's at 7k.

I chose to use a 22.5ohm resistor. If you have 50 ohm resistors lyring around, you can run it parallel and you'll get 25 ohms. DVCN stated that 25ohms felt the best. I picked 22.5 because I just wanted the best top end I can get and I thought something richer than 12.7 but leaner than 12.3 would be more ideal for top end. I may be completely wrong on this.

Instructions
Anyways, here are the instructions. I did this with the AFM removed, with good lighting.


First: Open up the black cover on the RX-7 AFM. I used a screwdriver to pry out the cover. Try to be careful not to nick the plastic too much.
Second: Clear the way. The connection you want to work with is the third one from the right, with the AFM's inlet to the right of you. Bend the fourth one out of the way a bit so you can get the soldering equipment in there.

Third: Bend the resistor to the shape you think you will be using. Cut the connection appropriately. Clean the area if there are any visible impurities.

Fourth: Carefully solder the area. You don't need excess lead on the contacts. Make sure it doesn't overflow and touch other contacts.

Fifth:
Seal the cover. I gobbed on blue RTV onto the cover edges and then placed it back. I gobbed on some more RTV around the edges afterwards. It will dry to a nice rubbery seal.
Finished! Do a test run and see if you like it. I did not have to adjust idle at all; it sits okay at 850-1200 rpms. Funky because my car has power steering and AC removed, yours could be more stable.

Results? Added 1+mph on my maximum speed on my home track. Note that the second fastest speed I recorded were done on cooler temperatures. Between my mods, I accelerated faster than a 1.8l miata with a bone-stock engine.

Thursday, November 4, 2010

Sway bar short endlinks

Total Price: 19 dollars.
End link prices are pretty high. I don't really understand why. I guess when the endlink uses exotic-ish lining on the heim joints to reduce noise might get expensive. Some people build from parts they got from McMaster-Carr. Everything I find on McMaster-Carr that I found elsewhere, M-C had the higher price. Of course, McMaster-Carr does sell a huge variety of products in a single catalog that makes it easy for you to browse.  Furthermore, their customer service is excellent, and shipping is fast.  So if you need high-end rod ends quickly, say for your formula car's pushrod end,  it would make sense to go with them.  Otherwise, keep searching! Or just go with what I found.

I bought short endlinks from ISC racing before. Good price. I broke that endlink when I crashed into a curb over the summer, so I went on hunting for a replacement one.

QA-1 Racing, the guys who make the springs I have on my car, are also rod end manufacturers. Total cost is 19 dollars for two short endlinks. Check out their website. For the Miata, you want the 10mm right hand thread MCF rod ends, male and female. Two of each. You can get two jam nuts from a local hardware store for about 50 cents. You will have to source the spacers elsewhere though. I just found some spare nuts and threaded the rod end mounting bolts through it. Sure beats spending 70 dollars on a set. 

QA-1 has a minimum order of 25 dollars. But if you get both front and back sets it should clear the minimum order. They also have prompt customer service. When I asked for part weights and other specifications, I got a reply the next day with the information I wanted.

My car is really noisy to begin with, so I might not be noticing it, but I didn't notice any additional noise. Tolerances are pretty acceptable to me, measured totally scientifically by taking the rod ends and bolts and moving them around by hand. They also survived use at the local road course, and both me and my co-driver went off course that day.

Link to company: QA-1 Motorsports

Wednesday, November 3, 2010

Racechrono - Reasonably priced datalogger (GPS Lap Timer and Data Logger )

I have been timing my laps and analyzing my driving and car tuning through a GPS data logger. There are so many options out there, ranging from an enthusiast level logger such as the Performance box, to full-fledged expandable professional solutions like the Race-Technology DL-1. Prices range from 400 dollars to many thousands of dollars. Some of these products are very solid and capable. Others are kind of crap. For example, MaxQdata sells a product called "TraQr." It is priced at nearly 300 dollars. As far as I know, the unit is nothing more than an off the shelf GPS logger that is available for much less. In fact, if I recall correctly, the MaxQ unit even looks similar to an off the shelf unit with a different logo on it. And there are those units out there where you can pay a hundred dollars or more than this solution I am about to propose, for simplicity (usually these are standalone units) and a bit of added capability.

My advice is this. Do some research before you plop down cash on any data logger. A lot of research. I wouldn't have found out about this solution if I hadn't done so.

I have been running a 5hz data logger for about a year now. Recently, I switched over to a 10hz logger. Some of the things I can do with this rig are as follows: lap timing, lateral and longitutional acceleration (G-forces), lap comparison with a lap from any session, traveled route. If I spent a bit more money and had an OBD-II car, I can do even more.


So what is the cost of all this? As low as 80 dollars to a maximum of 120 dollars. Yes and it is reliable. Yes it is light weight. Yes, it can be a live timer. Yes, there is a lot of community support. All possible thanks to these guys:


(Image is a link)

Racechrono is a very capable, free, data analysis and lap timer software. It is being constantly updated and best of all, it is free! It supports Windows Mobile and Symbian operating systems on phones. Of course, there is also version for your personal computer. I won't go too much into details, but I have some screen shots on the bottom. You can also read about it on the RaceChrono website.

Items needed
So what do you need for live timing and data logging? There are several different ways to do this, but this is probably the most cost effective way.

1. A Smartphone or a PDA
Samsung Blackjack. Old, but gets the job done.
You need a smartphone that either runs on Windows Mobile 5.0+ or Nokia S60 2d ed.+ with bluetooth support. This part can be really cheap. My first phone for this rig was an old Samsung Blackjack. It cost me 50 dollars for a good condition used phone with several chargers, car chargers, extra battery, and audio output adaptor. Slim, light, got the job done. But If you are going to run the 10hz GPS receiver, I recommend a phone that runs on Symbian. This is because the 10hz receiver seems to have some issues logging at 10hz unless you set the baudrate manually through the Racechrono software, and this trick doesn't work on Windows Mobile phones. I currently run a Nokia 5340. It feels like it works much better with RaceChrono. Having a large, touch screen makes it a lot easier to use in the cockpit. I also recommend a phone with SD card support. I hate using cables to upload data. I used this website to look up phone specifications: Phonescoop

2. GPS Receiver
There are many options out there. I recommend the QSTARZ BT-Q818X for 5hz, and QSTARZ BT-Q818XT for 10hz. This is because these units are cheap and hassle free. Other units need to be set to 5hz through special software on your computer. These units have an external switch that selects the rate (Off-1hz-10hz). The price differences between the X and XT model is very small; just go ahead and get the 10hz model. If not, you have an option of getting other bluetooth receiver-only models (like the ones I mentioned) or getting one that internally logs. There is no point on getting the latter unless you want to manually export the NMEA data and upload it to your device later.

Qstarz BT-Q818XT
 Note: when you shop for the receivers, do some research to find out if the update rates are actually what they claim to be. Often times they are 3-4hz units that interpolates internally to 5hz, or it updates at a certain rate but its ability to log it doesn't match the update rate. There may be other issues as well. The units I recommended work just fine.

3. Securing the receiver
I used to use blue painter's tape. I got tired of that so I went out and bought heavy duty velcro from wal-mart. The adhesive is can be very strong, and so is the velcro. One patch at about 22mm diameter is plenty enough to hold it in place. I used two. Minor problem is that the rubber backing on the BT-Q818XT doesn't work with the adhesive. I simply peeled the backing off using my finger nail. Its tough but it will come off. 


Setup
1. Download the Racechrono file from the website
2. Download it to your phone. I used my SD card to do this.
3. Run the file using your phone's file explorer application.
4. In the RaceChrono menu, go to Settings -> GPS Receiver -> Baudrate and set the baudrate to 115200.

How to record a track
1. Start a new session. Write your session title, Driver, and then go into the Track option.
2. Select on "Create new" and write a track name.
3. Select "start" on the bottom left.
4. Drive a full lap. Don't forget to do a outlap, warm up, and a cool-down lap!

How to set start/finish line
There are two ways to do this. In-car, and after your laps. Don't do the in-car method. It is stupid and you will get off your line as you lose concentration. After you do your laps, park your car at the pits. Make sure your session is paused: if not, click on "pause" at the bottom. Browse traps -> add new -> start/finish line. Either use the directional buttons or if you have a touch screen, drag the screen left and right. You can zoom in for more accuracy. Hit "OK" at the place you want. If you are doing an autocross walk, you can set start and finish seperately as well.

How to set splits
Follow the same procedure above, except if you already have a track plotted out, you don't have to have the timer running (resume session). Add splits as desired.

Live timing
Very simple, as you start the session just hit "start" or "resume" and then hit "switch to live timer." If your phone has an accelerometer, it will recognize the position of the phone by itself and orient the display landscape or portrait. If not, you can go into the menu and set it up manually.

Overall impression
I really like it. My old 5hz unit would (probably through interpolation) match the Performance box times when I ran them together. The 10hz unit must be even more accurate. The 10hz logger is apparently an actual native 10hz that really logs at that rate. Amazing for the price! The Racechrono software is very capable and very complete; it is just as good as high-end systems are. Furthermore, you can expand it with a bluetooth OBD2 reader and log even more parameters. You can find out how to at the Racechrono website. Racechrono for your PC can import and export data to many different formats, including format that is compatible with Racelogic and other data analysis software. This adds so much versatility to this system. And it is so affordable. If you are a professional team that needs to log shock position at 100hz, have steering and brake position sensors, and need 20hz+ GPS log rate, this unit is obviously not for you. But if you are an enthusiast, club racer, or autocrosser, this system will carry you a long way.


Teaser


Also free, made using 5hz data.

BT-Q818XT can be found at amazon for a good price. Phones can be found on ebay, newegg, etc.

Various photos, screen shots. Last photo courtesey of RaceChrono. Click for bigger picture.


RaceChrono Logo provided by RaceChrono
Samsung Blackjack photo is a Samsung publicity photo.


Monday, November 1, 2010

Gainesville Test Track Day Report - 10/30/10

My co-driver setting tire pressure before the event
Enjoyable weekend again. I had a co-driver today also, who fortunately didn't flip my car or destroy my transmission. His name is Brian, and I think you'll be seeing him on this forum more often.

Unfortunately, I do not think I will ever achieve Project OLDAZENIS.

I was only able to turn in a time of 1:02.49. No improvement since the last event. This is with me figuring out more parts of the course and benefiting from the added horsepower from the RX-7 AFM and a further 30lbs of weight savings. I had at least wanted to get in the 1:01.XX range, but the course was run in reverse for the second half of the day and I did not get to work on my driving.


But I have some good news. I had put together an endlink for really cheap. It is by far much cheaper than the other endlinks available on the market. It held up fine.

The RX-7 AFM gave me measurable gains. The previous Vmax (maximum velocity anywhere on the track) was at approximitely 72.6 ish, with my benchmark driver Grant driving the car. My previous Vmax is very close, but I believe it was a bit lower. Today, with temps in the low to mid 80's, my new Vmax was 73.6. This is probably partially for the 30lbs ish weight loss from removal of the passenger seat. To offset this influence, I was running almost a full tank of gas when I recorded this. Gasoline is approx 6lbs per gallon.

I also learned to squeeze out some more speed out of the course:
The insides of various have more grip. It might be cambered less. It might also be more abrasive, but I have yet to verify that. I am getting better at feeling out how much grip I have left on the rear wheels, helping me accelerate out of corners.

And finally, my driving continues to improve. I have to be smoother and keep better car control. This is just going to take practice. Every time my rear end slips out a bit I am losing speed. So if I do a very good lap, and then have the back end kick out or the car veer off line a bit, that lap will be wasted. I will keep shooting for consistency. I did have much more fast laps than last time, so my consistency must be improving.

Tire aging and grip
My driving keeps improving on this circuit. Because of this I find it difficult to gauge how fast my tires are wearing, and heat cycling because my driving is changing. My lines are changing, which makes the peak cornering areas different in each corner. Also, compared to my previous sessions, I am spending more time closer to the limit. However, the peak G forces are a bit higher on my old runs. Therefore, I conclude that my driving is getting better, and my tires are losing their grip. That is the only explanation I can come up with to explain the fact that my laptime has not improved, since I am driving better and my car is faster.


Results
Best time: 1:02.5
Temperatures about low 80's.

Changes in the car since last event
Custom RX-7 AFM mod
Passenger seat removed
Rear sway bar completely removed

Effect of removed passenger seat
With the passenger seat removed, the car cornered to the right much faster. Peak Gs are noticeably different, and I can feel it as I am driving also.

Driving improvements
I am being more consistent with my lines and hitting all of the apexes. However, I still come out too wide while entering turn 9. I should be closer to the inside. If I can be smooth consistently going into turn 4, I can hug the inside of the turn instead of being pushed out. No doubt faster. Please check out the videos at the bottom of this post.

My co-driver being chased down by a vintage formula Ford
Link to videos:
Jerry Lee 2nd session
Brian Inacay 2nd session

Link to pictures from this event

Thursday, October 28, 2010

Dimitry James Photography

Many years back, when I still lived in San Diego I met this nice gentleman in Qualcomm stadium. He was out there taking photos of the cars out there while they were autocrossing.

Dimitry is from Switzerland. He is often traveling in and out of the U.S. taking photos of cars, and if I recall correctly, pursuing his education as well. He is a very nice guy, very easy to get to know!

I personally really dig his photographs. He always finds interesting backdrops to shoot them at. Here are some samples.


The man himself!
He says his style is shorts and flip-flops. Much like myself. However, as you can tell his style is much more refined than my... "style." Please check out his photoblog!

Tuesday, October 19, 2010

S4 RX-7 Air Flow Meter and Adaptor Part 1.

First of all, please remember. Do the projects in my blog at your own risk. If something happens to you, it is your fault. Don't try this unless you agree with the disclaimer at the top of my blog! 

Oct 30th is my next track day. The weather is improving and it is a good chance to shoot for my 60 second goal. Unfortunately, my tires are wearing down also. I still need to do everyhing I can to bring down my laptimes. This time, I'm going to take some more drastic measures. I only have a couple of days. Need more power!

 
Check out my new intake setup. My RX-7 AFM is finally installed. Stock 1.6L airflow meter flows at about 165 CFM. At 7000 rpm, the stock 1.6L motor requires about 178 CFM.* The stock AFM is only good to about 6000 rpms. This is probably the biggest restriction in the intake system. The most cheapest and simplest way to remedy this situation is to go with an RX-7 AFM. If you got the money though, buy a good ECU and go with a MAP setup so you can do away with an AFM altogether. One thing to note: this will work for a stock 1.6L AFM also.

Which Air-Flow Meter?
The AFM out of the Series 4 ("s4") FC RX-7 (1986-1988) is the one you want. This AFM comes off of 13b rotory engines. This unit is compatible with the miata AFM. It is basically the same AFM with different dimensions. All you have to do is calibrate it a bit.

As you can see from the picture, the intake to the AFM is rectangular. It is also bigger than the hole in the stock AFM. Therefore, you cannot use the stock airbox, nor can you simply mount an aftermarket air filter on it. There are many adaptors out there that will work.


Choosing an adaptor
Many web-based vendors well cheap, simple mounting-plate type adaptors as pictured here. You can find these for less than 10 dollars on E-bay, and sometimes on Amazon. The problem with these is that the abrupt round-to-square transition is not very good for airflow. You want air to enter the AFM as laminar and fast as possible. You want the flow to stay attached to the surfaces of the intake tract as long as possible.

These are cast or machined units. Most of them are made from aluminum, but I think a few of them are made of steel or some sort of plastic. HKS, Bonez, Weapon-R are some brand-names that make this and I believe a few users on a Rx-7 forum make and sell this adaptor. Some of these companies used to sell theirs for under 30 dollars in the early 2000's. They are around 50-60 dollars now. Wow, 50 bucks for a mass produced adaptor of this sort? That disqualifies these units from our consideration. Lets make a Hi-Kick version of it. The adaptor I made has the tapered surface and should be plenty strong enough. Furthermore, the adaptor I chose is longer, and because of this the tapering is more gradual. It might even flow better!
 
Instructions
Okay, we're splitting peas here. The gains you get from having a tapered surface probably is not super-significant. And we're not going racing, where every gram of advantage counts. So why care? Because taper features apparently cost 40-50 more dollars, so we're going to come up with a solution and kick the problem in the head.
 

There are many ways to do this, but here are the specific parts I used.

1. Spectre Air Sensor Adaptor, Part 8141 or 81413   ($10-13)
2. Sheet of rubber, RTV sealant, or a usable OEM gasket on the AFM. ($5-8)
3. AFM off of a 86-88 RX-7 ($20-50)
4. JB-Stik or other putty-type expoxy that bonds to metal as well as plastic ($5-7)
5.Air Filter - From an S2000 or Honda Prelude. Prelude Part numbers: ($9-20, more in the $10 rage for the Prelude part)
  Fram CA6543
  Purolator AF4486
  Honda 17220-PK2-661
  STP CA6543
6. 3" Rubber or silicone coupler (PN: Spectre 8771) ($3-5)

Tools and other stuff you need
1. Dremel with a grinding wheel 
2. Sandpaper
3. Drill and 1/4" bit

The Spectre kit can be found on autozone or advance auto parts in the rice section. Everything else is available at your local parts store. The Prelude air filter is half the price of the S2000 filter.


Step 1. Line up the AFM, plastic plate, and the aluminum adaptor. Get the edges of the adaptor to line up with the opening in the inlet side of the AFM. Clamp it down. The holes on the adaptor plate of this particular kit line up perfectly with the AFM's holes. Mark the holes using a permanent marker, and then drill the holes using a 1/4" bit. This way, you have some room to move the items around since the holes are bigger than the holes in the AFM.

Step 2. Take the plastic plate that comes with the Spectre kit, and dremel or file down the opening so it will more closely match the opening on the AFM. Have the plate bolted in, along with the adaptor tube when you do this so it won't shift when you dremel the plastic plate. Resulting shape should be a rectangle with rounded edges.

Step 3. Sand down the plastic surface of the plate and the inner surfaces of the aluminum adaptor, on the areas that you will apply putty to. Wash it off with water and mild soap, rinse, and make sure it is completely dry before going to the next step. 

Optional step: Cut off the rubber plug that the Sepctre kit somes with.

Step 4. You can skip the sealant part of this step, but I took RTV and made a ring around the adaptor tubing, taking care to not to use excessive sealant lest it seeped into the surfaces where we are about to put epoxy on.


Optional step: before you start epoxying the entire thing, plug the hole made by the removal of the rubber plug.
Take the adaptor tube and mount it on the plastic plate, and bolt it in as how it would be when the kit is installed. Care to line it up properly. Don't mix up up and down, since the dremelwork will not be perfect. Mix up your epoxy and start filling the area left on the edges of the circle. Do one edge at a time, since you only have 5 minutes or so before the epoxy gets too hard. Be sure to press it in well so it will fill all the crevices and rough surfaces from the sanding.


Follow this diagram that I've attached, but it should be more elongated and gradual. You want a both convex and concave shape for it (I think there is a word for such shapes). Basically, you want the air to follow it up, over, and into the AFM without seperation. Try to get the surface as smooth as possible and the curvature as symmetrical as possible. Try to get the surface of the epoxy as smooth as possible with minimum bumps. Here is how to make sure the surface leading up to the AFM is flat: gob in excessive epoxy, then use a straight edge and press down, using the AFM inlet itself as a brace. Try to get the putty as smooth as possible with the least amount of bumps. It is kind of hard to do with your fingers. Matthew Wilson gave me this tip. Wet your fingertips with water, and it will allow your finger to move over the surface without gripping at it too much. It is also useful when making the edges of the epoxy more filleted. Remember: the smoother it is, the less sanding you will have to do.


Example of bad putty-work ;-)

Step 5. Let it cure for a few hours. Sand the surface of the epoxy with fine grit sandpaper until you are satisfied with the finish.

Step 6. If the gasket in your AFM is toast, use Silicone RTV to seal it properly by tracing the edges on the AFM where it is supposed to seal.


Step 7. Assemble. Self-explanatory. In order to use the Honda OEM filters, you have to use a flexible coupler since both the filter and adaptor opening is solid and inflexible.

Tada! Your adaptor is complete. J-B stik putty is pretty tough and resists vibration, so it should be good for this application. This should flow pretty well, though it might be a bit heavy side (maybe an ounce or two). Now that the adaptor is complete, you can mount any type of filter on it that has a 3" opening. Looks kinda cool doesn't it?


Enjoy!

Dog doesn't care about this new AFM set-up
Next up is an article on how to tweak the RX-7 AFM to run more optimally on your 1.6L engine, and how to mount it on the car.

* Flow data from www.solomiata.com, maintained by www.flyinmiata.com.  

Related links: Tuning the RX-7 AFM

Wednesday, October 13, 2010

A small piece of my achievement.

A poorly made part of my undergrad university's website, but I guess my face has been on there for a while. Funny thing is that I never took an ME course from there.


Pictured are teammates Phillip Weary, Joshua Baker, Tyler Hendricks, Scott Przybylski, Jerome Tuason, and yours truly. (left to right)

Tuesday, September 28, 2010

Goals goals goals. Project OLD-AZENIS (but not 215 old)

Wow. It has been months since my car has roared in its 1.6 liter rage. I haven't done any of the projects that I said I was going to do. Its gotten a few more rust spots on the surface and I haven't washed it in a long time. 

On the other hand, I've been doing better at school. Dean's list baby! My grades still aren't that great but now I can say I'm a dean's list student and am an editor on two journals. Pimp! I still don't feel like I am very good at school. If you hear me talk about this it is usually because I am in disbelief and not because I want to boast about it. Besides, that is like walking around telling everyone that you are a nerd. I haven't changed at all you suckas. 

We all need goals. I think my problem with this motorsports hobby is that I haven't had a goal in recent years. I have less drive to do these projects and things just haven't been happening. So tonight, I propose the following goals:

1. Pass the minute mark at Gainesville test track on Falken Old-AZENIS. I'm about 2.5 seconds away. My benchmark driver is a bit less than a second faster. I don't have many more mods to do in the near future.

2. Organize either - a Miata-only track event before I graduate law school OR
Start a graduate school track day club before I graduate from law school.

How will I reach these goals?
The good: My camber settings are always eyeballed. Properly tuning them should solve a lot of problems. Also, I still haven't done my RX-7 MAF swap and air intake fabrication. With these two I think I can get within the target time without an issue.
The bad: I'm going to have to downgrade my front brake pads because I can't afford another set of Hawk blacks. Old-Azenis are discontinued and mine are about 40% worn; I have probably less than 3 events to do this on. 
The Ugly: Trying to balance school and time. I will also be having a co-driver next event so that is even less seat time to achieve my goal in.

Short-term project Old Azenis begins here!

Monday, September 20, 2010

Update: E-bay Coilovers and NB Bilstein shocks


One of the readers, Rod, has sent me an update about installing E-bay coilovers on NB (1999 - 2005) Bilstein shocks. Thank you Rod and I apologize for my super-lag in making these posts!

Rod: I bought the Celica-labeled coilovers from miragepower on Ebay. I had no intent to use the springs from the kit. The kit that arrived contained four 2.5" sleeves, which are the rear sleeves off of the kit Jerry received in this post. I had no plans of using the springs that were provided.

I wanted to run stiffer springs and adjustable spring perches on my 99 Miata which already has NB bilstein HD shocks. The NB Bilstein HD spring perch is contoured to fit a spring so resting a coilover sleeve on them was impossible. Additionally, there is a tab on the shock body that matches a keyway in the spring perch to secure it. This tab prevents a sleeve from resting on the Bilstein circlip.

The NA sleeves do not have a keyway for the tab on the shock body, so tabs were cut off. Once the tabs were off we could see that the "Celica" sleeves are indeed a perfect fit for the Bilsteins and sit properly on the circlip. Turns out I didn't need those NA perches after all!

My setup is 2.5" diameter Eibach Racing Springs, 6" 525lb in front & 7" 325lb in the rear. With the front perches set about halfway up the sleeve they just snug the springs against the top hats. The resultant ride height is 12.75" hub center-to-fender. At the rear I have the perches about 4 threads up from the bottom of the sleeves and the ride height is approximately 13.25". I expect the car to settle and will adjust the perches after a few days.

Unlike Jerry's experience, there is only 1 circlip on the NB Bilstein HD shock. My sleeves are sitting on that circlip. On an NB Miata using NB Bilsteins, there is no need to machine another groove in the shock body. My ride height will be far too low if I use the bottom range of the adjustment.

In the end, I only used a few parts from the eBay kit: the perches, sleeves, the rubber "donuts" between the springs and lower perches, and the washer for the top of the shaft. No need for the set screws, o-rings, or any other parts.

Thanks for your posts, blog, and many helpful emails. I have ended up with exactly the setup I wanted and spent less than $200 rather than $400 for a comparable Ground Control-type kit.


Thank you for the kind words and the contribution Rod!

Monday, September 6, 2010

We went up the river and came back one short


Sub-title: I love consumer electronics but hate seeing people get "Sucka'd" 

My blog really aims to save enthusiasts money by persuading them to try alternate solutions instead of dropping a lot of money on something that can be had for much cheaper. I've stressed before that so many things in the racing and motorsports world are overpriced. A little bit of ingenuity and willingness to experiment can save you a lot of money, which in turn you can spend on more seat time! 

Another way of expressing the above sentiment is saying "willingness to risk throwing away your money." If you are familiar with automotive technologies you can really hedge that risk by wasting immense amounts of time doing research. This is really bad especially if you and your parents spend thousands and thousands of dollars (and borrowed dollars) to put yourself through graduate school and you don't pay attention to the oh-so-expensive lecture because you are doing said research.

That is why I love it when I lose something or something gets destroyed. This past weekend I went to the springs to float around on my tube, relax, and toss out a fishing lure from it. It was my feeble attempt to combine a girlfriend activity and my kayak fishing past-time. I decided to take my cell phone with me; I had a habit of doing that in my kayak adventures for emergency situations. I double-bagged it in zip-loc bags.

Well, the bags failed and my phone is toast. It sat in water for a few hours. I dehydrated it and everything, but it doesn't work at all. My phone numbers are gone, but my track data is saved on my hard drive and my memory card. Crap. I have important phone numbers in my phone that I am sure is not on my SIM card. But I do really need a new phone.

I found out that the software I use to log my data now supports cell phone internal accelerometers. And I've found a bunch of low-cost 10hz GPS receiver options, including some dedicated standalone options. Nice! So I guess my phone will have bluetooth and an internal accelerometer. Once I put all this together, I will make a post on how YOU can save money also!

I'd like to make a statement here; when I feature products, I do not plan on mentioning any company names except for the ones of the products I am featuring. For example, with this data-logging post I will not mention companies that re-badge existing receivers and tack on a hefty price, or companies that make comparable pro-grade hardware and software that low-level consumers like us do not need. Whether in the hands of a sucka or a serious professional, those products have their own place in the market and I appreciate any additional market entity because competition breeds better and cheaper products. Plus, I will be in need of a career after one more year; not a good time to be pissing off manufacturers :)

Sunday, August 29, 2010

Qstarz releases 10hz GPS receiver

Did I ever mention that I lost my GPS receiver my last track event? After writing my last track report, which was way too long ago, I could not find my GPS receiver. I know I have not made an entry about my super-cheap data logging setup but no doubt some of you already do the same thing I do. I will make a separate entry about it later. Remember, I am committed to saving us poor student enthusiasts as much money as possible.

Anyways, my lost receiver is a Qstarz BT-Q818X. It logged at 5hz; good enough for my needs but 5hz is some really rough timing (interpolates to 1/10ths) and nowhere near enough to do any serious suspension tuning. Not like I will be doing any serious suspension tuning. Turns out that there is a new model out so I would have bought another one anyways!

Apparently this is old news but Qstarz have been listening to this small market where poor racers are too cheap to spend 500+ dollars on a real data logger.  Qstarz released a 10hz version of their 818X. It is called the BT-Q818XT. XT for Extreme? Just like my old one, it had an external switch that changes it into 10hz mode, so you won't have to get into its settings. This means that this gadget is completely "plug-and-play."  Switch to 10hz (which also turns it on), start your timer/datalogging software, and drive! Take that Pbox!

The battery on my old one lasted over 30 hours on standby mode, and even after a track day I would find it still turned on after a day of forgetting to turn it off.

So, reader, if you are like me and already use a near-free data logging system, then go and buy the new receiver! If you don't and don't know how, go do your research or wait for my post explaining how to use this gadget for data logging. I will be buying this as soon as I get money for next month. About 80 dollars on Amazon.com.

Official product link

Thursday, August 5, 2010

Gettin' back to the swing of things.

Unfortunately this summer I really did not get to do many things on the track.  I beat up my car while commuting over these stupid brick roads in downtown Orlando and put on about two thousand miles.  Needless to say, the car needs work.  Here is a to-do list before school starts

1. Replace headlight lamp
2. Replace valve cover gasket
3. If needed, replace spark plugs
4. Secure front lip (one side is falling off)
5. Complete front air dam, even if it looks ghetto. My original plan was to make a very professional lookin' fiberglass piece. I have all this material sitting around not getting used.

My little cousin is visiting from Korea. My uncle is giving me some money for showing him around, so I may be able to order some stuff needed for me to get going on the air dam project.

Saturday, July 31, 2010

Back in Gainesville - What do YOU want in life?

Woohoo! I am back in Gainesville.  Although I liked being in the city, I missed my nice house, clean garage, and quiet neighborhood right on top of law school.  I had such a fulfilling experience in Orlando.  I saved up the money I needed to save up, met judges, attorneys, businesspeople, made new friends, got my kickboxing training on, and most of all gained work experience.  The only thing missing is motorsports.  I did not get to do any of such!  I had originally wanted to rent a kart but life caught up to me and couldn't spare the time or money.  

I did read a racing related book: Perry McCarthy's Flat Out, Flat Broke; Formula One The Hard Way.  This is an autobiography of Perry McCarthy's racing life.  He has a nack of making thing happen and his networking skills were no doubt important in making his career possible.  It was a very inspiring book and it fueled my desire to network, so it actually helped me get out there and meet even more people.  In my typical do-or-die fashion when it comes to finding jobs, I left my resume everywhere and shook hands with as many people as I could.  My father said face time is key in success, and I adhered to it the best I could.  We will see what happens as the years go by.  A couple of attorneys even asked me to give them a call when it is time for me to graduate!

I know the title sounds grand but what I want in my life in the short term is actually pretty simple.  I don't have grand, all-encompassing long term goals.  I am constantly thinking about these things, too.  It is what fuels my life: If I have something I want I can't stop thinking about it until I get it.  A girl, a car, a new pet, a job, you name it.  And boy will I get it.  If you remember, I wanted a koi fish pond.  That dream hasn't changed and my koi fish are doing fine in their 30 gallon plastic tub.  When I move them to a pond, I hope they grow to be behemoths.

This time, I am thinking about what car to get when I get my first job.  This is what I want in life.  My needs are very simple; cheap, seat time, reliable.  I've decided to add two more criteria, which shall surface in my writing as you read on.  My first car was a Ford Focus that I wrecked several months into driving.  I didn't know anything about cars so that doesn't count in what I am about to explain.  Subsequently, I've owned a Miata, a truck, two motorcycles, and another Miata.  I never owned more than one; the vehicle was my daily driver/rider.  My first Miata was a 99 which I drove 2006.  Truck was a 90, which I owned in 2008.  My first motorcycle was designed in 1986, and my second bike was designed in 89.  My current Miata is a 92 and has no air-conditioning, power steering, and has stiff springs and a race seat.  Do you see a trend?  Although, most of the year I get to drive my girlfriend's car which is quite comfortable.


So I'm sick and tired of driving uncomfortable, old and beat up cars.  But I can't bring myself to make the horrible investment of buying a newer car.  I've thought about buying a Hyundai Genesis; RWD, 3000 lbs, 200 horsepower and an LSD for 24k!  I've thought about buying an E36 M3.  Or a used NSX--my friend Walter got me to fall in love with these cars when he showed me his when I was twenty years old.  All great, awesome cars. But still, how will I feel when I bend a control arm hitting a curb on the track?  How much will it cost?  I can't bring myself to drive a nice car like that.  Besides, I've really wanted to start taking my girlfriend and the dog on a camping trip somewhere remote; what better than a 4x4 to do that?  This is the Josh Neubauer influence.  


Besides, nothing really beats karting in terms of experience vs money ratio.  My first day on a racing kart was on a KPP (Komer Piston Port, formerly HPV) kart at the old Moran kart circuit.  It was an amazing circuit with elevation changes, and I got to do it for 50 minutes.  I almost cried.  I am not kidding when I say this was one of the most memorable experiences of my life, right up there with when I got 4th place in my MMA tournament.  Impressions like that don't go away easily, and in the back of my head I can still smell the strong stench of burnt castor oil and feel the two stroke engine rattling my body.  Oh and the sensation of the tires scraping the tarmac.  It felt so direct and how can one forget that.  If I can find the time to race my kart once or twice a year, it would keep me very happy.


So instead of doing schoolwork, I spent hours researching what SUV to buy.  I finally figured out the perfect balance of all the things I need.  I wanted a car less than 10 years old for once which has a real audio system and air conditioning.  Also, it had to be a real 4x4, that can "go anywhere" as Josh says.  A Jeep rubicon might have done it but that is too expensive and gets absolutely horrible gas mileage.  I do not understand why that doesn't come in diesel!  I've thought of Samurais and Trackers but those are too old.
 
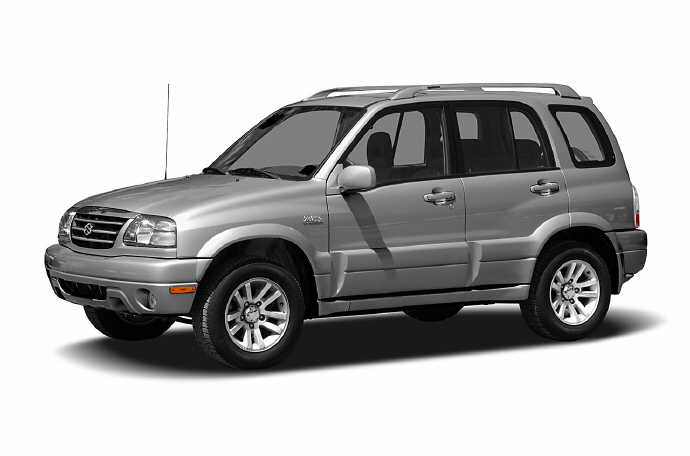
But I found it; 1999-2005 Suzuki Grand Vitara, the last japanese SUV that is imported to America that is was properly designed to go off-road.  I really don't need that much in creature comforts and with a locker and a set of appropriate tires, this little SUV should "go anywhere" including work and grocery stores.  I'll probably get a winch, portable tools, some lights and a roof rack to turn my urban attack vehicle into a capable camp-mobile.  Plus, it will have no problem hauling my kart trailer, even if I load two karts on it.

Okay, enough ranting.  So I can make these dreams come true, I am in the process of trying out for a journal in law school.  Having been on an academic journal really boosts your resume.  I've been procrastinating a bit but I am going back to writing this case-comment for the write-on competition.  I've been working on this paper all week.  

All of these things will come true and please keep track of me as I make this happen!


Oh, and in case you were wondering, yes I am going to continue developing my Miata.

Photo Credits: Photo 1: owned by Josh Neubauer in one of his 4 wheeling trips; I'm actually not even in the picture nor was I there for the trip.    Photo 2: my very first day on a racing kart at Moran Raceway.  This may sound cheesey but it was absolutely the drive of my LIFE.    Photo 3: 2005 Suzuki Grand Vitara.    Photo 4: A lucky photo of me proving that I actually used to race a kart. For a hilariously short period of time. I will be back though! Yes that is me.

Friday, July 9, 2010

Gainesville Test Track Day Report - 6/12/10 - From soft to stiff, compliant to responsive


I am new-york bound this weekend to see my girlfriend and my dear friend Nick.  I can't remember how many times I have been to New York City, but no more touristy stuff. Just food, old friends, and girlfriend is enough. I was sitting at the airport pissed-off at delays and bad Jetblue customer service. I thought this was a perfect time to get some work done, look at my track data, and write my report. So here goes!
Some mixed feelings with this track day. First and foremost, the e-bay coilovers held up fine. Nothing broken and although I have not taken measurements yet, the ride height looks the same. I event went off the asphalt this day and it survived it just fine. I think the perches and sleeves work well although how it will do with 100+ mph incidents remains to be seen.

Conditions
It got very hot starting from very early in the morning. 80's throughout the morning and 90's past 11AM. In car temps must have been over 105 when the car wasn't moving. Very humid also. It reminded me of when I was living in Thailand.

Changes from my last event
Tire pressures: 36 front, 32 rear, later changed to 31 and 37.
Random eyebaleld toe-out settings
Max front camber (probably 2.5+ degrees)
Front ride height: 5"
Rear ride height: 5.5"
No corner balancing
(alignment and ride height set with 180lbs ballast in driver's seat)

Mobile 1 GL4 synthetic transmission fluid
Mobile 1 5w30 oil (I used to run 0w30)

Session 1

I immediately notice how much the car likes to oversteer. The oversteer hurt speed everywhere. The car would turn-in at much faster speeds but would not stay stable. On corner exit it punished me every time I got on the throttle. This session I managed to put two wheels off coming out of turn three. I spun out another time after turn-in at turn one. Not enough rear grip. Embarrased, I cut the session short and came back into the paddock area. I detached the rear sway bar and went right back out.

Session 1.5
Much better. The car was drivable again and I started adapting to the newly set-up car. The biggest thing I noticed was that the car was harder to drive. Not only was it faster in all of the corners and was more responsive, it was much less forgiving. I knew this would happen but experiencing it firsthand was something. By less forgiving, I mean that the envelope of "optimal" is a lot narrower. It felt like the  tires had a smaller range of acceptable slip angle. I can't quite wrap my head around it but I hypothesize that the added grip is from a better contact patch resulting from better camber control, and the edginess is from decreased tire compliance from the higher spring rate. This session was spent trying to get used to the thinner performance envelopes. Tough! Even though I do not think I was driving as well as my later sessions, I logged my best time this session of 1:02.5 due to optimal temperatures.


Session 2
I am figuring out some new lines with the car's setup. The drive out of turn 3 completely depends on how smooth you were throughout turn 2. As hypothesized earlier, turns 5-6 became a double apex corner with this better handling setup. Fast time 1:02.7. I am starting to get more consistent. I am no doubt just driving better than I did last time.

I took a bit of a break after the third session to cool off and hydrate. I brought my awning. Thank goodness. Shade helps so much. Plus, it makes you instantly more popular on the track. I did get to meet some new people that day, but I was able to stay focused. I'm really a pretty social guy, but usually at the track I try and force myself to be a track loner so I can concentrate on driving.

Session 3
Last session, I spotted another Miata on track and I followed him a couple of laps. The car had more body roll than mine but it was definately not stock. I was curious on how it drove. The owner was a nice man named Mike. I offered Mike a drive in my car in exchange of the same in his. Some people get selfish about their tires and car. Not me; it was always beneficial to gather more data about different cars and different setup, especially if you have some way to log your data. Plus, if you are dealing with a better driver, you can learn a lot about how your car can be driven also. To my relief, Mike wasn't selfish either.

Mike's Miata is the same 1.6L Miata, with some sort of handling package installed. I had originally thought the car oversteered too much from watching him drive. However, I was pleasantly surprised. First, the power steering was nice. It made steering the car a lot more pleasant to drive, albeit at the expense of steering feedback. Second, due to the lower spring rates, the chassis and suspension reacted slower as wheels go through their travel motions. This gives you much more time to figure out what the car is doing and anticipate what is about to happen and react timely. The car did not oversteer and it was very neutral.  It was comparable to my FM spring setup.


This car had front and rear sway bars. I think running adjustable front and rear bars with lower spring rates is really the answer, instead of eliminating the rear bar and running higher spring rates like most Miata guys do. My car is in the latter camp. It is hard to tell from data if that is better or not since my car's exhaust and lighter flywheel makes it accelerate faster, so I will have to wait to drive Mike's car again to use my butt-data-logger.

Session 4 and 5
I am beginning to experiment with different lines going into the turn 7-9 complex. This time I am entering the corner much faster; the new setup allows me to shift the weight of the car around and make the left turn right at the geometrical apex. I still can't figure out if coming in fast and barely making the lines is faster, or if coming in slow acellerating earlier is faster in this section. Data says coming in slower is 0.1 seconds faster than when I dive-bomb it. Unfortunately, in this session someone had kicked up dirt right after that apex so I could never tell if it were faster. It seems that I am losing 1-2 mph worth of acceleration from hitting the dirt.

On session 4 I went off-course. I think I almost flipped my car coming out of turn 3. At one of the laps, I had a very good drive out of turn 3. I was not used to all the speed and got two wheels off the track, maybe three. I flew back on, sliding. I thought to myself, "I might just flip this car in a few moments" as I was correcting the oversteer, thinking that I was going to end up in the grass on the other side at a bad angle. I didn't. The ebay sleeve/perches survived that. I think I must have been doing 50 mph at the time.

Conclusion
I was kind of disappointed because my lap times kind of sucked. This is partly because of the hot weather. Still, I felt that I learned a lot more than I usually do from this track day. Maybe that is why I have a much longer entry. Stiff cars are faster but harder to drive. I felt that in my bones today. Being smooth pays off, and you should experiment with different lines and always use real data to make judgments on which is faster.

Notes on fitness
I am a pretty fit guy. I have stamina stacked up somewhere from my fight training days, and I still excercise a lot despite school. This summer, I have had two jobs and I barely get to train. So basically my fitness levels have dropped. I found myself taking longer breaks. I found the heat from the sun, firewall, transmission tunnel distracting quite a bit. This bothers me; I want to develop a mental toughness and get back into shape so that I can drive hard. Just like fighting, I think practicing hard driving under adverse, fatigued conditions is what makes you faster when you are not tired.

Air temperature
Fastest time 1:02.5. Only 0.2 seconds faster than my previous record. I think this shows how much impact air temperature has on laptimes. Data says I probably would have gone a full second and a bit more faster if the air temps were the same. 2% faster in all the corners, and the better handling balance allowed me to get a much better drive out of the corner. My rudimentary math shows that on  this track, temperatures of 10 degrees differences nets about a second difference. Of course, if it gets really cold I think grip levels change also so the curve is probably not flat.
 
I am on my plane now. It has been an annoying and agitating night with multiple delays. Getting yanked around here and there. I kept getting told that it was weather, but when I pressed the issue I discovered it was due to maintenance. This poor girl in front of me swapped tickets just like I did for another faster flight; except she believed the weather excuse and paid 40 dollars to do so. Turns out that staffing the second flight was contingent on the first flight. Wow! Airline staff could have figured out. Basically, this girl gave Jetblue 40 dollars so she can be late anyways. Caveat Emptor! Experience definitely counts in the airline business. Delta, while as ghetto as Jetblue, runs its flights much smoother. I don't understand why I keep flying Jetblue, it is really not worth the 30 dollar savings over Delta.

This is a picture of me and my friend Josh Neubauer in Grand Central Station. Josh has a Toyota 4x4 that he uses to do rock crawling; his truck has been featured in off-road magazines. Josh currently is a cake specialist at Culinary Institute (the school Anthony Bourdain went to). It was very nice to see him again. Maybe we'll do an entry about off roading sometime! Josh has made all sorts of cakes from Jeep wheel and tire to a Chinese dragon. He still owes me a Miata cake, but hopefully it will be a Formula Ford cake or something cooler by the time he gets around to it!


Note: Sorry, my report is over a month late. With the multiple jobs that I have been working I simply could not find the time to do this. Plus, I have been kickboxing-crazy. Every spare moment I had I spent at the gym. I am getting better and better, training with very good fighters. Every day something is bruised and I'm trying very hard not to fall asleep at work. I usually fail. Please forgive me, the head coach is a legendary former world champion! You wouldn't pass up this opportunity either. Back-dated on July 16th, post made on around July 9th